- recommended if you dig
- Posts
- journalists: how to download all your videos, with view counts (free)
journalists: how to download all your videos, with view counts (free)
stop letting other people control your portfolio
dex digi
February 22, 2024
stop letting other people control your portfolio
[a note: this one is mostly for journalists who work in video, who might need to download their work from YouTube. this might not apply to you! but if you know a journalist or creator who might find this useful, feel free to forward it to them!]
The Internet is not permanent, especially for video.
I probably don’t need to tell you that news outlets are going out of business left and right. When this happens, there’s a very real possibility that your work could disappear, forever.
With text, odds are if someone deletes an article, it might still be on Wayback Machine/archive.org.
But with video on YouTube, once it’s gone, it’s just gone. So, I recommend backing up your work now, while you still can.
I’ve put together a free software setup that will do this for you, automatically.
There is some software out there that does some of this. For casual users, I’d usually recommend this app. But there are tradeoffs: it is easy to use, but the free version is limited – only letting you download 30 videos/day. And even the paid version doesn’t have some features I wanted.
For example, if there are YouTube stats you are particularly proud of, like view counts or comments, you may want to be able to show that off in your portfolio.
So here’s a tutorial for backing up everything, in one shot, for free.
This setup will allow you to download either a single video at a time, or an entire playlist at once. I used it to automatically download a full 140+ video playlist in one shot.
Note that this setup is all just existing free software – what I’ve done here is made a step-by-step tutorial that shows you how to install it, along with a couple tweaks that might be relevant for you.
Here’s what this setup does:
downloads the video in the highest-possible quality
adds the upload date and the viewcount into the file name
downloads the video’s description into a text file
downloads a bunch of other info, including all the comments (this is a messy file, but you can clean that up later)
downloads the video’s thumbnail
Here’s a preview of the files that you’ll generate from one YouTube video:

Table of Contents
Let’s get started
The first thing you’ll want to do is grab something called ‘brew’. This is an installer that will get the rest of the software for you.
Note - the below section is for Macs only. If you’re using Windows, use these instructions to download yt-dlp, and follow thru step 14. Once you’ve done that, come back and skip down to the downloading your videos step.
Installing brew
First, we need to open a Terminal. Here’s how to do it:
Click the Spotlight (magnifying glass) icon in the top right of your screen, type Terminal in the search field, then click the black ‘Terminal’ icon when it pops up.

You’ll see a window with some plain text. Mine looks like this:

your window might be different colors – don’t worry, it’s the same thing!
Once that’s open, you’re going to want to copy-paste some text into the terminal.
Copy-paste the following line into the terminal, and hit Enter.
/bin/bash -c "$(curl -fsSL https://raw.githubusercontent.com/Homebrew/install/HEAD/install.sh)"
Make sure to copy-paste exactly as-is.

it should look like this!
Once you hit Enter, it’ll start telling you that it’s going to install some stuff.
It may ask for your password a few times. Go ahead and follow the instructions – it’s safe!
It will take a while though, especially if you’ve got an older computer/slow Internet. If it looks like it is frozen – it isn’t! This could take ~10 minutes, so go ahead and let it do its thing.
Once it finishes, you may see that it is showing you a message near the bottom of the output, under the heading Next steps, telling you to run an extra command. It’ll look like this:
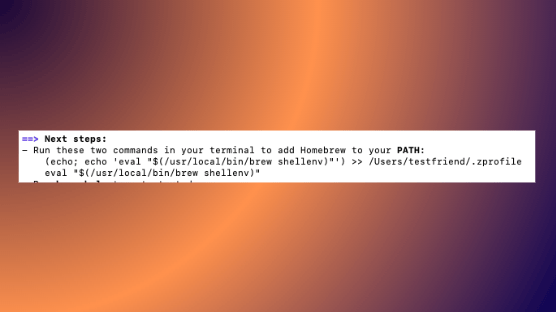
Your output will look a little different from mine (eg my username here is ‘testfriend’, and your username will be different). So, just go ahead and copy-paste that whole block of text as it appears in your Terminal, like so:

and just hit Enter.
It won’t give you any sort of feedback or ‘success’ message, it’ll just give you a new blank line, as you see in the image above.
cool.
That’s the hardest part done.
Installing ffmpeg (for high quality videos)
Now, we’re going to install something called ‘ffmpeg’, which we’re going to use to allow us to handle better-quality video downloads. This is optional, but I think it’s worth it.
Your Terminal should still be open. Copy-paste this in:
brew install ffmpeg
And hit Enter.
Like before, it’ll start installing stuff. This will take a bit, so let it do its thing. It took about ~3 minutes on my machine.
Installing yt-dlp
Okay, almost there. This is the program that’s actually going to download stuff for you. This step is very similar to the last one.
Your Terminal should still be open. Copy-paste this in:
brew install yt-dlp
And hit Enter.
Like before, it’ll start installing stuff. This will take a bit, so let it do its thing. It took about ~3 minutes on my machine.
pointing the files to the desktop
Now here we go. Home stretch!
First, we’re going to tell the program where to put your downloads.
Go to your Terminal, and copy-paste this in:
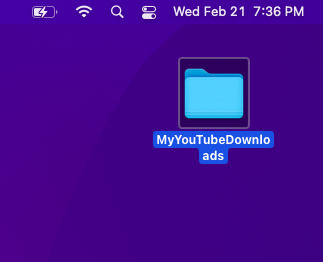
mkdir Desktop/MyYouTubeDownloads && cd "$_"
Once you do this, it won’t give you any real feedback other than showing the ‘MyYouTubeDownloads’ in the command line.

But let’s check to make sure it worked. What we’ve done here is Make a Directory (mkdir) called MyYouTubeDownloads on your desktop. Go ahead and double check your Desktop to make sure it’s there:
That way, it’s easier to find everything.
All set. Now time to download the videos.
Downloading your videos!
You have two options here. You can download a single video, or you can download an entire playlist.
If you have a lot of videos to download, what I might recommend is just making a playlist on YouTube (you can use your own account to do this) of every video you want to download, and then you can put THAT into the command.
Anyway, here’s the command you want to use.
Copy-and paste the following into your Terminal and hit Enter.
yt-dlp -f bestvideo+bestaudio -o '%(title)s [uploaded %(upload_date>%Y-%m-%d)s | viewcount %(view_count)s].%(ext)s' --write-description --write-info-json --write-comments –-write-sub --write-thumbnail -- PASTE_THE_CODE_HERE
in the place where you see PASTE_THE_CODE_HERE, you have two options.
If you just want to download a single video, you want to grab the code that is just after the = sign. So in this video, that would be the following:
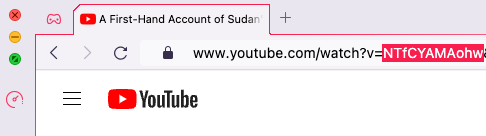
and I would paste this in:
yt-dlp -f bestvideo+bestaudio -o '%(title)s [uploaded %(upload_date>%Y-%m-%d)s | viewcount %(view_count)s].%(ext)s' --write-description --write-info-json --write-comments --write-sub --write-thumbnail -- NTfCYAMAohw
If you want to download a whole playlist, video, you want to grab the code that is just after the = sign. So in this playlist, that would be the following:

In that case, my code would look like this:
yt-dlp -f bestvideo+bestaudio -o '%(title)s [uploaded %(upload_date>%Y-%m-%d)s | viewcount %(view_count)s].%(ext)s' --write-description --write-info-json --write-comments --write-sub --write-thumbnail -- PLw613M86o5o50MQlphdddr-pcTbplaT6L
Important: if you made your own playlist on YouTube, it might be set to ‘private’ by default. In order for this program to ‘see’ your playlist, it has to be public!
So, just make sure to set your playlist as ‘public’ before trying this method.
sit back and wait!
Once you hit Enter on the above process, it should start running. If you’re downloading a big playlist, this could take a while. I’d budget about ~3 minutes per video, or longer if you have a slower machine or a slower connection.
but you don’t need to worry too much about it. Just leave the window open, and let it keep running until it’s done.
If you want, you can monitor it by opening up the MyYouTubeVideos folder on your Desktop and making sure it’s actually writing the files. It should be writing stuff in realtime, and it will look something like this:
Anyway, have fun!
how to open those videos (.webm)
by the way, the high-quality videos are being written as .webm, which you might not be familiar with (since it’s not a .mp4 or .mov).
To open the file, you can use a program called VideoLAN. This is a free program, and easy to install! You can grab it here.
There are also ways to convert the .webm to other formats (eg .mp4). The easiest is probably Handbrake, which is free, and can batch-convert your entire folder of videos at once!
need help? got suggestions?
I’m not an expert at this by any means, but if you need help, you can try a few things:
the comments section here
checking the below sources/documentation for more info!
I’m @dexdigi on IG and usually pretty responsive there
Email me – contact is on whatupdex.com
By the way, if you have any ideas on how to improve this setup, I’d love to hear them. Send it to me and I’ll try to implement them and update this page.
I’d love it if you can pass this on to a journalist/creator friend who this might help.
This isn’t the sort of stuff I usually do, but if you liked this, subscribe!
Sources/documentation
for Brew: http://brew.sh
for ffmpeg: https://formulae.brew.sh/formula/ffmpeg
for yt-dlp: https://github.com/yt-dlp/yt-dlp
for some tips on usage of yt-dlp: https://ostechnix.com/yt-dlp-tutorial/
Common Issues/FAQ
error message yt-dlp: error: no such option
you can fix this by making sure to put a space in between the last -- and the code you’re copying from YouTube.
So the end of your code should not look like this,
--NTfCYAMAohw
but instead look like this:
-- NTfCYAMAohw
I don’t have enough space on my desktop, can I put this on an external drive?
Yes! Here’s a quick video showing how to do that.
@dexdigi check my earlier tiktok for a demo #opensource #macos #journalist
Reply